Is your WordPress website secure?
How can you tell?
 Look at the top of your website: do you see a green lock next to your website address? Does it say at the top of the browser window HTTP://www.yourwebsite.com or does it say HTTPS://www.yourwebsite.com?
If you don’t see a green lock, HTTPS or any indication that says your site is secure, listen up — starting this month, Google Chrome plans to label websites as ‘unsafe’ if they don’t have proper security measures in place. This is part of a continuing project to eventually mark all HTTP sites as not secure, in order to make their browser safer and to alert users and protect their private info from external dangers (like hackers).
How does this affect you?
Do you have a search box or collect any information from your visitors, such as via a contact form, subscription sign-up or as part of a purchase?
If your site is being viewed in Incognito mode and/or if your site collects information via any type of form and isn’t secured with an SSL certificate, your website could be flagged as Not Secure. This label may scare your potential customers and could cause them to exit your site without doing business with you.
What should you do?
It’s easy! You need to get an SSL certificate and have it applied to your website.
What’s an SSL certificate?
An SSL certificate creates a secure connection between your website and the server, so that any info your visitor sends to you via your website will be protected and kept secure. It’s also what helps protect businesses that are selling products directly from their website (to safeguard visitors’ personal information like credit card numbers and other data).
Adding an SSL certificate to your website creates that extra layer of security Google Chrome is looking for. It will add the green lock to your site name, and when your visitors start to fill out a form it will show that you’re secure.
How do you add an SSL certificate?


If you sell products online, you may want to get a paid SSL certificate instead of a free one, for added insurance coverage. 9 Planets Hosting includes a free SSL certificate with every hosting plan, but if you need added insurance we also offer several paid certificate options that may work well for you.
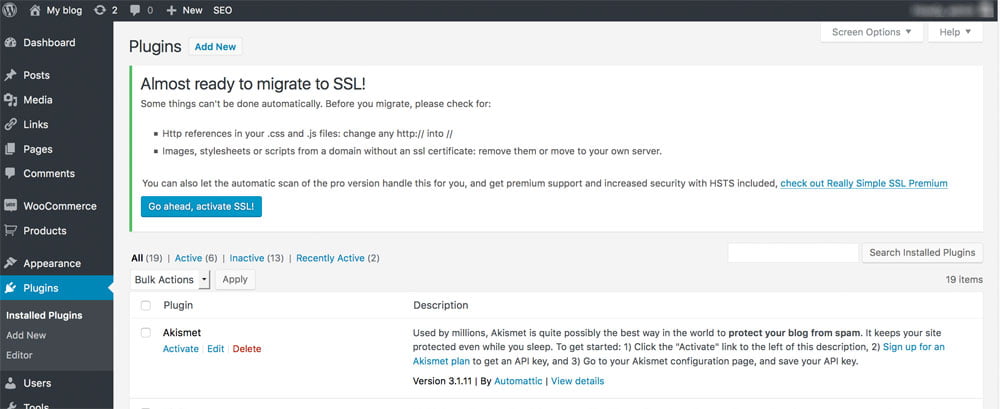
Once you have an SSL certificate added, you need to connect it to your WordPress website. If you want to set it up yourself instead of paying your host to do it for you, you can set it up using this Really Simple SSL plugin.
Steps to Set Up the SSL Connection
- Upload the plugin to your Dashboard > Plugins area.
- Activate the plugin
- You should see a notification asking you to enable SSL – click it and log into your site again


That’s it! You should now see a lock next to your website name at the top of the browser window, and when you click the lock, it should say something like “Secure” or “Secure Connection.”
Your WordPress website has now been updated with an SSL certificate.*
If your website has been set up in Google Analytics or Search Console, you will need to update your site information so that Google knows your site is now HTTPS://www.yourwebsite.com instead of HTTP://www.yourwebsite.com. For more instructions on how to update this (if your host isn’t doing it for you), check out this helpful article from Really Simple SSL.
*NOTE: If your site still says elements are un-secure, it’s usually because an image or other random site element didn’t get updated with HTTPS (instead of HTTP). To track down those stray items and get them updated, Really Simple SSL explains further in an article here.